How to Make an Adjustable Stand Up Desk for About $50
I recently read about the benefits of working at a standup desk in a couple web articles. It really intrigued me. I had heard of someone doing that before and I dismissed it as strange, but I didn’t think much about it at the time. The heath benefits the article claimed were pretty staggering. If it was right on just a few of these, I was interested. Heck, think of all the money I could save on coffee if standing up all day really gave me more energy! The article said sitting down all day caused problems like:
- obesity
- heart disease
- poor posture
- fatigue
I knew I wanted to better my posture and I’ve been trying various things over the years to help that. I’ve tried working on a fit/yoga ball, various types of pointing devices and different desk setups.
Once I read the article about the stand up desk I was interested. I went online and quickly realized you can spend a lot of money on a stand up desk. I wasn’t sure I would like it, so of course I wanted one that could up and down or a non-permanent solution. I tried to figure out how I could elevate my desk and keep it stable. The desk only needed to be about 15″ higher. I saw pics online of people stacking things, but I have a rug in my office and I didn’t think it would be stable enough.
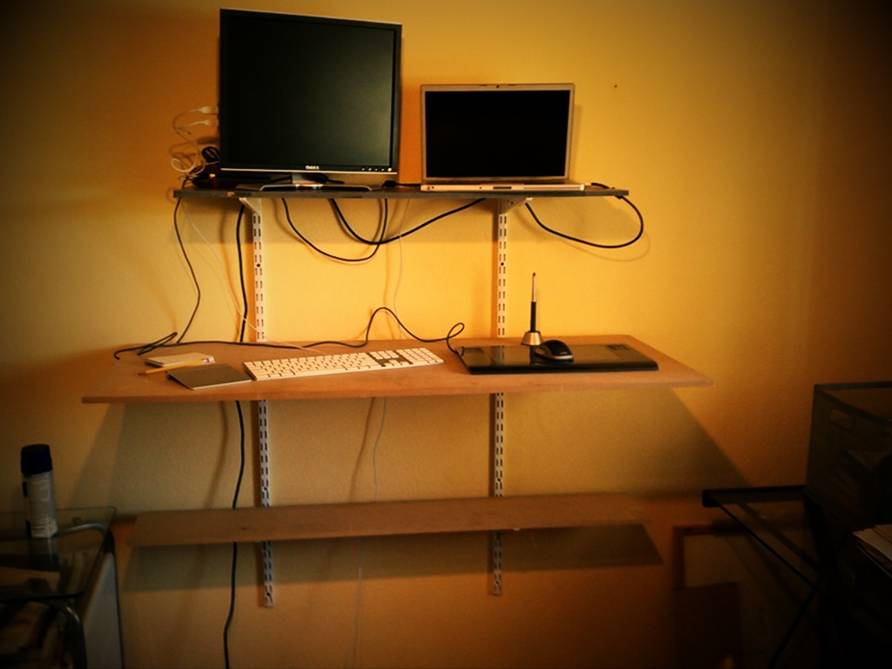
A trip to Home Depot and some wandering of the isles, brought me to a clever solution. Here are some simple things you can get to make a home stand up desk that is adjustable. This one is wall mounted, so you may need to re-organize you office some.
Go to your local hardware store and head into the isle for shelving.
What to Buy
- 2 each of Rubbermaid FastTrack 25 in. Upright Track Extension – $11
Note: You can purchase these if different sizes, if for example you want a lower shelf. - 2 each of Rubbermaid 11-1/2 in. Twin Track Bracket – $8.5
These are for the top shelf to hold the monitors. - 2 each Rubbermaid 18-1/2 in. White Twin Track Bracket – $13.50
This is for you keyboard and mouse to go on. - 1 each piece of wood 48″ x 22″ x 1/2″ – $9
You can change the size based on what you want your desk like. - 1 each piece of wood 48″ x 12″ x 1/2″ – $7
- Screws to mount the tracks to the wall – $4
Total: Aprx. $55
You could get it down to $50 if you used cull lumber for the upper shelf which goes for about $.51 if you can find the right size.
Tools You’ll Need
- Drill
- Screwdriver
- Studfinder (optional)
- Level (optional)
Set Up
You’ll screw the wall mounts to studs in the wall, making sure they are level. The desk portion should be the height of your arms bent at 90 degrees. Set the monitor shelf so that the monitors are at eye-level.
My Review
So far I love my stand up desk. I moved around more which is great for my posture. I also don’t have the inevitable neck sag that occurs whenever I sit down. For casual computer experiences like watching YouTube, it’s not as ideal for, but if I’m in front of a computer I should be getting some work done. I still get a little tired at the end of the day, but in general I feel more alert while I’m at the machine. I also find this desk set up to be easier to adjust for ergonomics than a sit down desk. I may add some cross supports to the desk shelf for stability, but aside from that, I love the set up and I think I”ll be using it for awhile.
Working 12 to 16 hours a day makes my back ache. I had been planning to make a stand-up desk so I could continue to work with my body stretched a little bit. Thank your for posting and sharing your idea about building a stand-up desk.
Most people prefer to have a barstool for when their legs get tired. I use one on occasion as well.
Thank you so much for this post. I’m going to make my stand up desk ASAP.