Adding images and slideshows to WordPress
This article will help you through the process of adding images to your wordpress site.
Resizing Images
If you’re dealing with larger files sizes, say your camera shoots 10 megapixel images, then it might be best to resize your images before trying to add them to WordPress. Most servers have an maximum upload limit that is not large in comparison to image sizes. Changing this requires you go into your server settings or edit the .htaccess file (not recommended if you haven’t done this before). Best to call your hosting company or website designer. There are many ways to resize images and there are lots of different software out there to accomplish this task.
What Size do I make my Images?
Unfortunately, there’s not an easy answer to this one. The web standard for resolution has been 72 pixels per inch for some time now. Most monitors can display higher resolution that this, but as far as I know, 72 is still the magic number. Most websites are designed to be about 1000 pixels wide to accommodate screen resolutions of 1024 x 768. I have a 19″ monitor that is set to 1140 x 980. There are much bigger monitors out there than 19″ these days. To get a full screen size image, you’re going to want to size you image somewhere between 1000 to 2000 pixels wide. With monitors being different sizes and being able to display different resolutions, it comes down to guess work. Bigger image sizes take longer to load and fill up more space on your server. Another thing to note is that if someone were to steal your image, the bigger size they have gives them more opportunity to do things with it. So if you’re just more confused after reading this, just size them to 1000 pixels wide at 72 PPI and let the height fall where it may.
Easy Image sizing with Photoshop
- Put all of your images in a folder on your computer.
- In Photoshop, go File > Scripts > Image Processor
- Step 1: Select the folder your images are stored in.
- Step 2: Saving them to the same location is easiest. Photoshop will create a folder called JPEG within you image folder for the newly resized images.
- Step 3: Set the file type to JPEG, Select Resize to Fit, Put the Quality to 7, and add 1000 to the height and width settings (it’s doesn’t have to be 1000, you can choose what you want here).
- Hit the Run Button.
- Sit back and watch Photoshop resize your images.
Image Sizing with WordPress
This only works if the images are not larger than your server upload limit. By default, WordPress creates 3 sizes of each image you upload. You can add more, but it’s a more advanced task.
- Go to Settings > Media in the WordPress Admin.
- Set the sizes you want for Thumbnail, Medium, and Large.
- Hit Save Changes.
- You next image upload will be sized accordingly.
If you need to change the sizes of already uploaded images, you can do so with the simple-image-sizes plugin.
Add an Image to a Post or Page with the Add Image Button
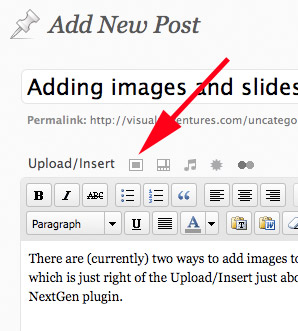
 One way is through the Add Media Icons which are just right of the Upload/Insert just above where you put your content into a post or page.
- Click the Add Image Button, it’s the first one and is shaped like a square.
- If you’ve already uploaded the image, you can choose it from the media library or the gallery tabs at the top of the window. Otherwise, you’ll browse for your image on your computer by hitting the Select Files button.
- Find your image and hit the Open Button.
- You’ll want to decide if you want to display the image at full size, medium, or the thumbnail if you created one. In most cases you’ll choose medium. You also want to decide if you want the image aligned left or right or center. Keep in mind if you align the image, the text will wrap around it. Normally that’s a good thing.
- The next step will be to push the insert into post button. Then you’re all set.
The code has been created for you. If you click on the HTML tab, it will look something like this:
img class="attachment wp-att-214 alignleft" src="http://visualadventures.com/blog/wp-content/uploads/2009/01/wordpress_image.jpg" alt="add an image" width="298" height="331"
NextGen Gallery
The other way is via the NextGen plugin. This site has a good description of how to use the NextGen Plugin. http://www.jennmearswebdesign.com/2008/08/13/using-the-nextgen-gallery-plugin-part-1/ The NextGen button will allow you to insert a slideshow, an image, or an image list. This is a great way to display a bunch of images at once. You can create a gallery, and then select that whole gallery to be displayed in your page or post.
Resizing Images in NextGen Gallery
NextGen Gallery also resizes your images on upload. You can adjust these settings at Gallery > Options in the WordPress Admin. NextGen Gallery settings allow you to specify thumbnail sizes, image sizes and slideshow sizes.
Additional Information


Trackbacks & Pingbacks
[…] buttons are to add an image see more about adding images here), a video, music or media (such as a PDF). The buttons to the right of this are standard word […]
[…] begin here by going over a few more of the features. (1) These buttons are to add an image (see more about adding images here), a video, music, media (such as a PDF). (2) The buttons to the left of this are standard word […]
Comments are closed.